Thanksgiving Crafts & Ideas
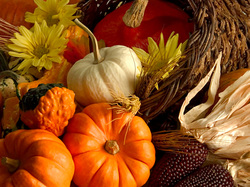
I love the changing of the seasons, especially fall when all the colors of the world are changing. So here are some kid friendly crafts to do with the kids on a cold day/night with some warm apple cider!
I am also including some of my favorite recipes for Thanksgiving dinner and some adult DIY ideas for the the perfect family gathering!
I am also including some of my favorite recipes for Thanksgiving dinner and some adult DIY ideas for the the perfect family gathering!
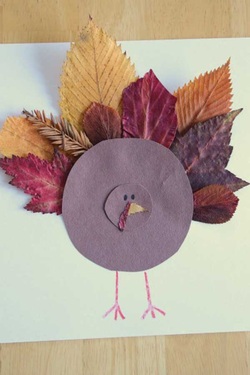
Supplies for Leaf Turkeys:
2. Cut out a 1-2 inch brown circle for the turkey’s head. Glue this circle onto the larger brown paper circle. Add eyes with crayons. Then cut a small piece of leaf for the beak and the red waddle and glue them onto the turkey’s face.3. Choose leaves to add as the feathers of the turkey. Slide them behind the big brown body and glue them down.
- brown paper
- white paper
- Dried and pressed leaves – you could do this with fake leaves as well
- glue
- scissors
- crayons
2. Cut out a 1-2 inch brown circle for the turkey’s head. Glue this circle onto the larger brown paper circle. Add eyes with crayons. Then cut a small piece of leaf for the beak and the red waddle and glue them onto the turkey’s face.3. Choose leaves to add as the feathers of the turkey. Slide them behind the big brown body and glue them down.
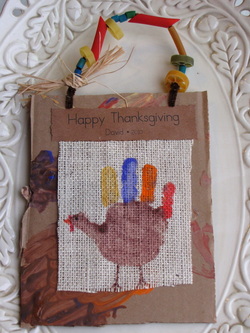
Supplies:
burlap, cardboard, paint, dyed noodles, paint, raffia and construction paper
burlap, cardboard, paint, dyed noodles, paint, raffia and construction paper
- Print painted turkey onto burlap.
- Kids each paint a piece of cardboard for backing.
- Glue turkey on painted cardboard.
- Punch holes in top.
- Wrap pipecleaner through hole on one side.
- Thread on dyed pasta.
- Wrap and secure other end of pipecleaner.
- Add raffia.
- Print “Happy Thanksgiving” with child’s name and year on construction paper.
- Cut with decorative scissors and glue on.
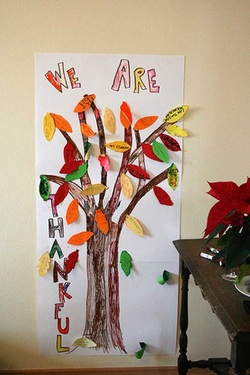
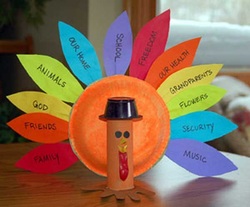
Butcher paper
Construction paper in fall leaf colors
Markers
Glue Tack (or glue stick, tape or push pins)
Scissors
Leaf Templates (I just googled free leaf template printables. Look for one that is simple to cut out)
The idea is to have the kids & adults if you want write on the leaf cut-outs what they are thankful for and tack them to the tree. I love this craft, we will be doing this one this Thanksgiving!
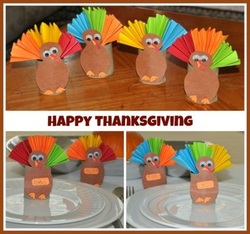
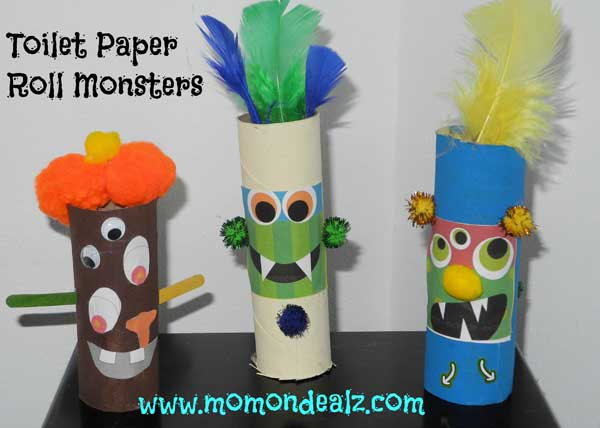
Paper Roll Turkey
- Toilet paper rolls
- Construction paper
- Colored printing paper
- Glue
- Googly eyes
- Stapler
- Cello tape
- Scissors
- Half the toilet paper rolls.
- Cut a body for the turkey from brown construction paper.
- Glue the turkey body to the paper tube.
- Add the eyes, beak, wattle and feet.
- We used colored printing paper so little hands could easily manipulate them and of course for their vibrant colors.
- To make the feathers , fold in a zig-zag pattern to make fans or in this case, turkey feathers.
- Staple different colored fans and gently separate the folds to open out the fan.
- Place them on to the paper tubes.
Thankful Turkey Craft:
2. When they are dry, glue the rims of the two bowls together. You can use clothespins or paper clips to keep them together if needed.
3. Next, glue the toilet paper roll to the bowl. This will be the turkey's head and neck. Glue it so that the bowl will stand up when the toilet paper roll is attached. Since some brands of paper bowls may weigh differently, so be sure to test this out to be sure the turkey will stand stable and will not tip over. Allow to dry.
4. To make the turkey's face, you can cut black dots from construction paper or glue on googly eyes.
5. To make the beak, take a small square of yellow or orange card stock and fold it into quarters. Then, cut off a triangle, with one edge along the fold (see photos). Open up the card stock, and then cut the resulting diamond in half. This becomes the beak, and it can be glued on as shown.
6. Take the red balloon and cut off the stem of it, where you would normally blow, into a "V" shape. Glue on the red balloon below the beak to become the wattle.
7. For the hat, use a small plastic condiment cup (I used a small solo cup). Paint it black. For the brim, draw a circle on black card stock, which is a little larger than the hat. Cut out the circle and glue it carefully to the hat. Then, glue the hat to the turkey.
8. For the feet, have your child trace her hand on brown card stock and cut it out. Then glue the hand to the bottom of the turkey. The fingers are the turkey's toes!
9. To make the feathers, stack a few sheet of colored card stock on top of one another, then fold them in half. Cut out a feather shape. You will end up with duplicate feather shapes for each color. Apply glue to one whole side of the feather, then add a toothpick near the bottom, with half of it hanging out. Then apply the other side of the feather, so the toothpick is “sandwiched in”. Allow to dry.
10. Poke holes in the back paper bowl, near the rim, with a nail or thick pin. Make the holes about 1.5 inches apart. This is where the feathers can be poked through the turkey.
- Two paper bowls
- One toilet paper tube
- Card stock in various colors
- Small red balloon
- Orange poster paint, and paintbrush
- Small plastic condiment cup
- Toothpicks
- Scissors
- Glue
2. When they are dry, glue the rims of the two bowls together. You can use clothespins or paper clips to keep them together if needed.
3. Next, glue the toilet paper roll to the bowl. This will be the turkey's head and neck. Glue it so that the bowl will stand up when the toilet paper roll is attached. Since some brands of paper bowls may weigh differently, so be sure to test this out to be sure the turkey will stand stable and will not tip over. Allow to dry.
4. To make the turkey's face, you can cut black dots from construction paper or glue on googly eyes.
5. To make the beak, take a small square of yellow or orange card stock and fold it into quarters. Then, cut off a triangle, with one edge along the fold (see photos). Open up the card stock, and then cut the resulting diamond in half. This becomes the beak, and it can be glued on as shown.
6. Take the red balloon and cut off the stem of it, where you would normally blow, into a "V" shape. Glue on the red balloon below the beak to become the wattle.
7. For the hat, use a small plastic condiment cup (I used a small solo cup). Paint it black. For the brim, draw a circle on black card stock, which is a little larger than the hat. Cut out the circle and glue it carefully to the hat. Then, glue the hat to the turkey.
8. For the feet, have your child trace her hand on brown card stock and cut it out. Then glue the hand to the bottom of the turkey. The fingers are the turkey's toes!
9. To make the feathers, stack a few sheet of colored card stock on top of one another, then fold them in half. Cut out a feather shape. You will end up with duplicate feather shapes for each color. Apply glue to one whole side of the feather, then add a toothpick near the bottom, with half of it hanging out. Then apply the other side of the feather, so the toothpick is “sandwiched in”. Allow to dry.
10. Poke holes in the back paper bowl, near the rim, with a nail or thick pin. Make the holes about 1.5 inches apart. This is where the feathers can be poked through the turkey.

supplies:
white cardstock
a roll of kraft gift wrap
crayons or colored pencils
glue stick
scissors
11 3/4 x 36" frame
Pretty simple Instructions:
white cardstock
a roll of kraft gift wrap
crayons or colored pencils
glue stick
scissors
11 3/4 x 36" frame
Pretty simple Instructions:
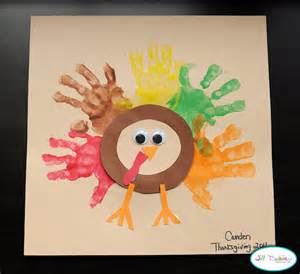
- Trace handprints onto white card stock
- Color your turkey and cut it out
- Cut out enough kraft paper till fill your frame
- Glue Turkey's to kraft paper
- Make name plates on white card stock and glue on kraft paper
- DONE!
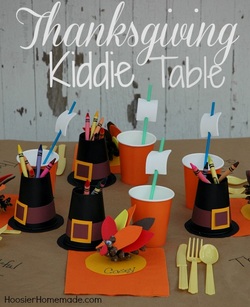
Pilgrim Hat Crayon Cup Supplies
Mayflower Straw Supplies
- Black cups
- Black cardstock paper
- Brown scrapbook paper for the belt
- Gold scrapbook paper for the buckle
- Glass or mug to use for a circle template
- X-ACTO #1 Z-Series Hobby Knife
- X-ACTO Designer Series 9” Trimmer
- Elmer’s Craft BOND™ Permanent Dot Runner
- Cut out a circle a little larger than the bottom of the cup from the black paper
- Cut the bottom out of the cup with the X-ACTO knife
- Cut a 1 inch strip of brown paper for the belt, if it doesn’t lay flat, you can curve the edges
- Cut a 1 1/2 inch square of gold for the buckle and a 1 inch square of brown for the inside of the buckle
- Using the tape runner or glue, attach the belt and buckle to the cup, attach the bottom
- Fill with crayons
- Pine cones
- Various colors of foam sheets {available at Hobby Lobby or other craft stores}
- Eyes
- X-ACTO #1 Z-Series Hobby Knife
- X-ACTO Designer Series Metal Ruler
- Hot glue gun
- Small scissors
- Cut a 2 x 3 inch rectangle for each feather
- Using the White Translucent Self Healing Mat as a grid, on the 2 inch end, start cutting a curve beginning at the 1 inch mark, repeat on other side to form the feather. Cut very small slits in the edges
- Fold each feather in half, lengthwise, and ruffle the slits a bit to give the feather some depth
- Cut waddle and beak from foam using small scissors
- Glue on eyes, waddle and beak using hot glue gun or other glue
- Poke feathers into pinecone
- Cut a circle for the place setting and write the names on with Painters
Mayflower Straw Supplies
- White foam sheet {available at Hobby Lobby or other craft stores}
- Straws
- X-ACTO #1 Z-Series Hobby Knife
- X-ACTO Designer Series Metal Ruler
- X-ACTO One Hole Grip Punch
- Elmer’s Painters
- Cut a 2 x 1 1/2 inch rectangle of white foam using the X-ACTO knife
- Punch a hole in each end
- Feed the straw through the holes
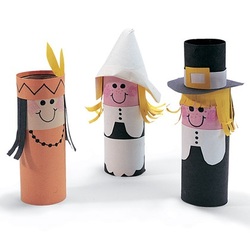
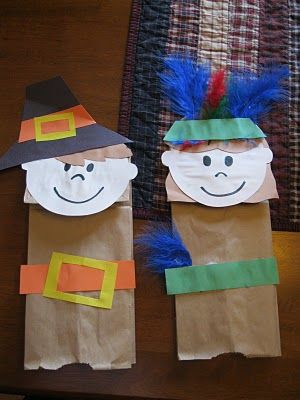
Aside from turkeys, toilet paper rolls can also be transformed into Thanksgiving pilgrims. Yes, if you want more decorations for this holiday aside from turkeys, then pilgrims will also do the trick.
Toilet paper roll pilgrims are fun to make, not to mention easy. All you have to do is cover the tubes with colored paper, and then start drawing faces and outfits on them. You can follow pilgrim and Native American outfits, then add yellow cut-outs for the hair, and folded paper for the hats.
You can use these pilgrims as decorations for Thanksgiving, or as improvised toys your kids can play with. They can draw the faces of the characters too!
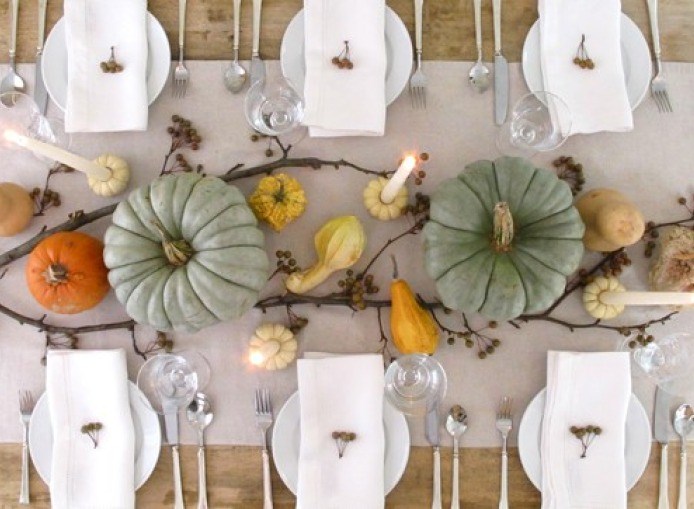
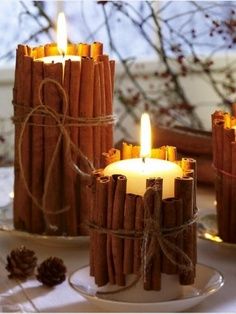
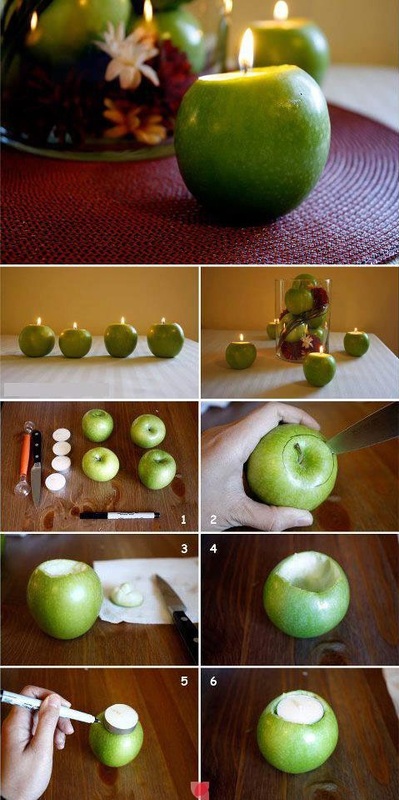
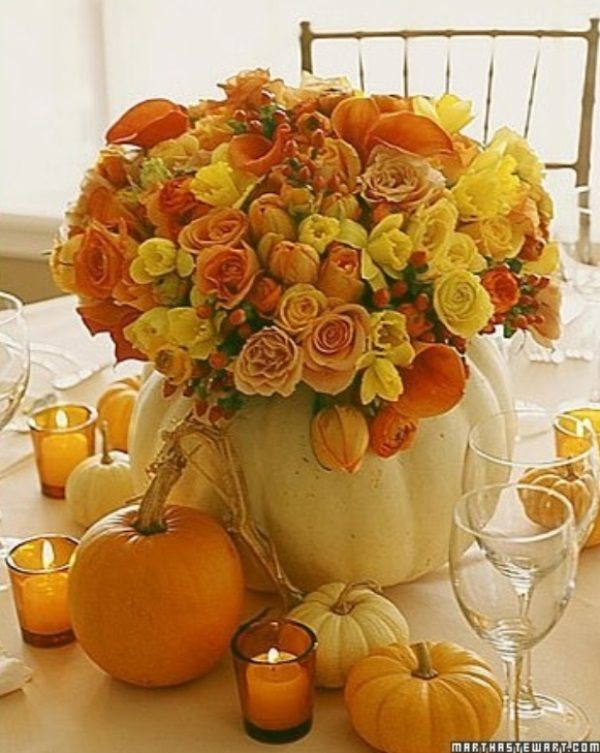
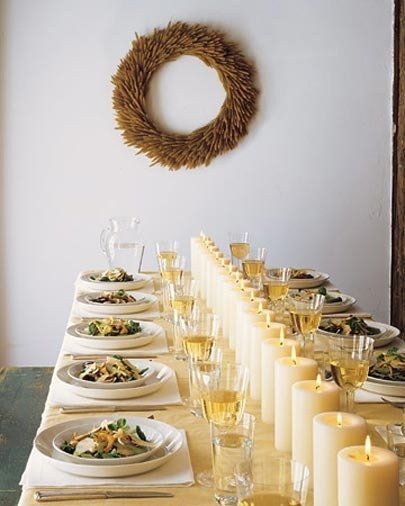
Adult DIY Thanksgiving Crafts


Recipes
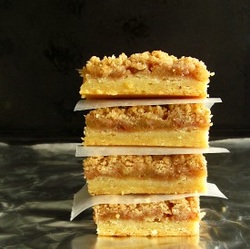
Apple Pie Cookie Bars
Prep Time: 1 hour, 5 minutes
Yield: 16 squares
This is a caramely-apply-buttery shortbread apple pie cookie bar. It's melt in your mouth delicious and "tastes like fall", as my friend put it. The directions may seem a little daunting, but hands on time is really only about 20-30 minutes until you put it in the oven for the last go-round. Try it out this Thanksgiving for a fun fingerfood twist on apple pie!
Ingredients
Preheat oven to 350 degrees F.
Line a 9"x9" aluminum baking pan with parchment paper.
For the cookie base:
In the bowl of an electric mixer, cream together butter and sugar until smooth and ligh colored. Add in vanilla and egg yolk and mix well. Add in flour and salt and mix just till incorporated and smooth.
Measure a 1/2 cup portion of dough and set aside to use in crumble topping.
Scoop remaining dough into the prepared pan and press into a flat layer using a rubber spatula. Try to make it as even and smooth as possible and extend it all the way to the edges. If the spatula is not working well, sprinkle the top of the dough lightly with flour and press it out with your fingers.
Bake for 16-22 minutes, until middle is set and edges are just starting to turn golden.
Remove from oven and set aside.
While the dough is baking, prepare the apple filling:
Over medium low heat, start to melt the butter in a medium sauce pan.
While the butter melts, toss the diced apples with a squeeze of lemon to coat.
Mix together the 1/4 cup of packed brown sugar, the 1 1/2 teaspoons flour, the cinnamon, nutmeg and salt.
Sprinkle the sugar/flour/spice mixture over apples and toss till coated.
Add apple mixture to the melted butter.
Turn heat up to medium and bring to a simmer (about 3 minutes). Continue to simmer until the sauce thickens (about 4 minutes).
Meanwhile, prepare the crumble topping:
Add the reserved 1/2 cup of prepared dough back to the mixing bowl.
Add in 1/4 cup plus 1 tablespoon flour, spices, brown sugar, and salt.
Mix on med-low until small crumbs form.
When caramel apple mixture is finished, pour it as evenly as possible over the cooked cookie base and, if necessary in order to spread it to the edges, genltly spread it with a spatula.
Sprinkle crumble topping evenly over the apple mixture, and bake for 32-37 minutes until edges are browned and bits of the crumble are golden.
Allow to cool completely before slicing.
Prep Time: 1 hour, 5 minutes
Yield: 16 squares
This is a caramely-apply-buttery shortbread apple pie cookie bar. It's melt in your mouth delicious and "tastes like fall", as my friend put it. The directions may seem a little daunting, but hands on time is really only about 20-30 minutes until you put it in the oven for the last go-round. Try it out this Thanksgiving for a fun fingerfood twist on apple pie!
Ingredients
- For the cookie base:
- 3/4 cup unsalted butter (1 1/2 sticks), room temperature
- 1/2 cup granulated sugar
- 1 1/2 teaspoons vanilla extract
- 1 large egg yolk
- 1 1/2 cup all-purpose flour
- 1/4 teaspoon salt For the apple filling:
- 3 1/2 tablepoons unsalted butter
- 2 Granny Smith apples, peeled and diced into 1/4" cubes (about 2 cups)
- 1/4 cup firmly packed brown sugar
- A squeeze of fresh lemon juice
- 1 1/2 teaspoons all purpose flour
- 1/2 teaspoon ground cinnamon
- 1/8 teaspoon fresh ground nutmeg
- Dash of salt For the crumble topping:
- 1/2 cup of reserved dough from the cookie base recipe above
- 1/4 cup plus 1 tablespoon all purpose flour
- 1 tablespoon packed brown sugar
- 1/2 teaspoon ground cinnamon
- 1/4 teaspoon fresh ground nutmeg
- 1/4 teaspoon kosher salt
Preheat oven to 350 degrees F.
Line a 9"x9" aluminum baking pan with parchment paper.
For the cookie base:
In the bowl of an electric mixer, cream together butter and sugar until smooth and ligh colored. Add in vanilla and egg yolk and mix well. Add in flour and salt and mix just till incorporated and smooth.
Measure a 1/2 cup portion of dough and set aside to use in crumble topping.
Scoop remaining dough into the prepared pan and press into a flat layer using a rubber spatula. Try to make it as even and smooth as possible and extend it all the way to the edges. If the spatula is not working well, sprinkle the top of the dough lightly with flour and press it out with your fingers.
Bake for 16-22 minutes, until middle is set and edges are just starting to turn golden.
Remove from oven and set aside.
While the dough is baking, prepare the apple filling:
Over medium low heat, start to melt the butter in a medium sauce pan.
While the butter melts, toss the diced apples with a squeeze of lemon to coat.
Mix together the 1/4 cup of packed brown sugar, the 1 1/2 teaspoons flour, the cinnamon, nutmeg and salt.
Sprinkle the sugar/flour/spice mixture over apples and toss till coated.
Add apple mixture to the melted butter.
Turn heat up to medium and bring to a simmer (about 3 minutes). Continue to simmer until the sauce thickens (about 4 minutes).
Meanwhile, prepare the crumble topping:
Add the reserved 1/2 cup of prepared dough back to the mixing bowl.
Add in 1/4 cup plus 1 tablespoon flour, spices, brown sugar, and salt.
Mix on med-low until small crumbs form.
When caramel apple mixture is finished, pour it as evenly as possible over the cooked cookie base and, if necessary in order to spread it to the edges, genltly spread it with a spatula.
Sprinkle crumble topping evenly over the apple mixture, and bake for 32-37 minutes until edges are browned and bits of the crumble are golden.
Allow to cool completely before slicing.
I will add more recipes as I go through and get some of my favorites out :)
HALLOWEEN CRAFTS
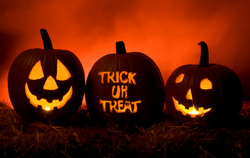
Well it's that time of year again, and I have to say one of my favorites! I decided to put together some very kid friendly crafts for the family. Below are some great crafts to do with the kiddos that do not cost alot. Have fun and
HAPPY HALLOWEEN EVERYONE!
HAPPY HALLOWEEN EVERYONE!
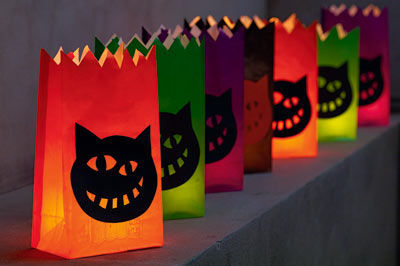
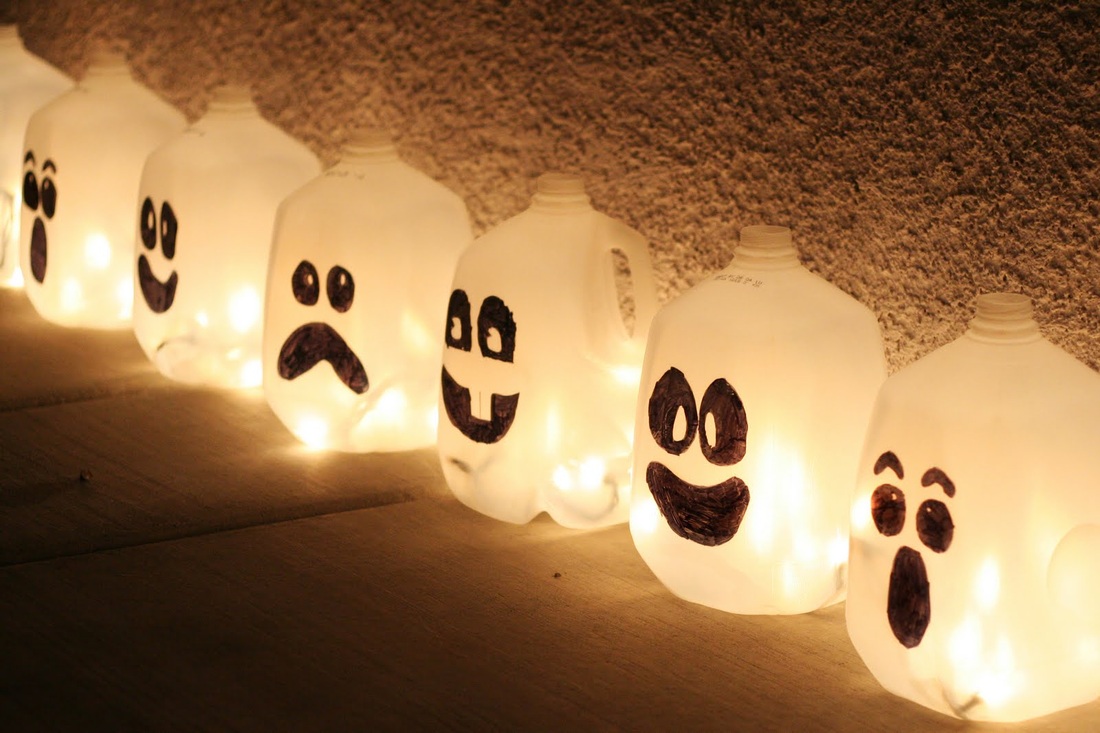
Total Time 1 hourAges school-age
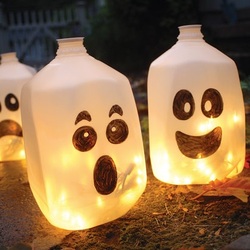
Stationed on a walkway or porch, these homemade lanterns will extend a ghostly greeting and good-bye to all your holiday visitors.
What you'll need
How to make it
Stationed on a walkway or porch, these homemade lanterns will extend a ghostly greeting and good-bye to all your holiday visitors.
What you'll need
- Clean plastic gallon milk jugs
- Black permanent marker
- Craft knife
- String of 50 clear low-wattage holiday lights
How to make it
- Draw ghost eyes and mouths on the jugs. Tip: Leave the caps on while you do this, so the jugs don't dent.
- Use the craft knife to cut a half-dollar-size hole in the back of each jug (a parent's job).
- Arrange the ghosts near each other and string the lights between them, stuffing several bulbs into each of the jugs.
Total Time 1 hourAges school-age
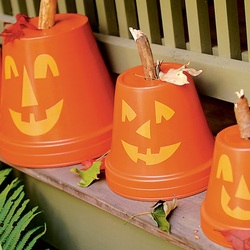
With this nonperishable alternative to your classic jack-o'-lantern, you can assemble a whole lineup of party pumpkins in short order — no carving knife required.
What you'll need
How to make it
With this nonperishable alternative to your classic jack-o'-lantern, you can assemble a whole lineup of party pumpkins in short order — no carving knife required.
What you'll need
- Terra-cotta pots
- Yellow craft paper
- Mod-Podge Outdoor
- Short, fat sticks
How to make it
- For each one, invert a terra-cotta pot. Cut eyes, a nose, and a toothy grin out of yellow craft paper. Brush Mod-Podge Outdoor on the surface of the pot where you want the features to go and press them in place.
- To weatherproof your creation, apply a final coat to the entire pot. Finally, insert a short, fat stick into the hole for a stem.
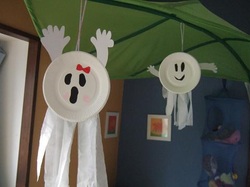
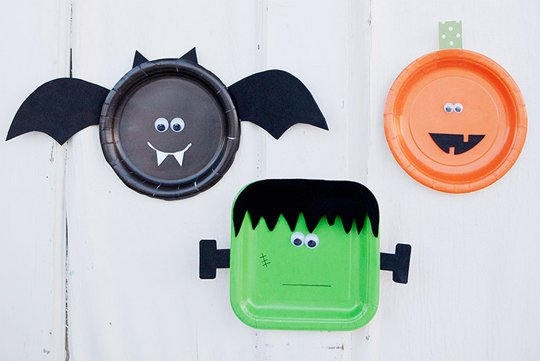
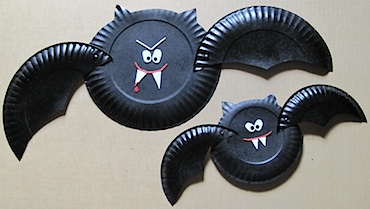
1) Construction Paper
2) Paper Plates
3) Streamers
4) Markers and/or Crayons
5) String
6) Tape, Glue & Scissors
You can make all kinds of things with these. Witches, Ghosts, Pumpkins, etc.
2) Paper Plates
3) Streamers
4) Markers and/or Crayons
5) String
6) Tape, Glue & Scissors
You can make all kinds of things with these. Witches, Ghosts, Pumpkins, etc.
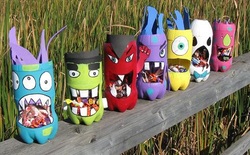
I saw this and thought this was just to cool! From looking at the picture this is a list I could come up with.
1) Plastic Bottles (2 Liter or 20oz)
2) Construction Paper
3) Acrylic Paints/Markers (Perm)
4) Hot Glue/Glue
5) Scissors (to cut top off & cut mouth)
1) Plastic Bottles (2 Liter or 20oz)
2) Construction Paper
3) Acrylic Paints/Markers (Perm)
4) Hot Glue/Glue
5) Scissors (to cut top off & cut mouth)
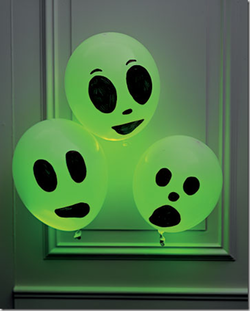
“Snap one or two green eight-hour light sticks so they glow, and insert them into a white balloon. Inflate the balloon and tie it closed. Use a black marker to draw a wide-eyed visage.” via Martha Stewart
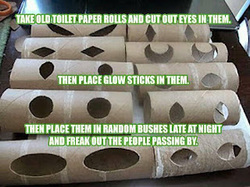
This one is pretty easy. Take the toilet paper rolls and cut out "eyes", then place the glow stick inside. You can then put them anywhere!
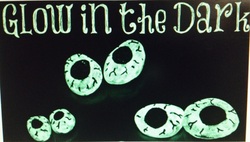
Here you will need the following:
1) Rocks
2) Glow In The Dark Paint, Acrylic Paints
3) Paint Brushes/Sponges
*Pain design on the rock first then after it dries use the glow paint on top.
**You can also use ping pong balls :)
1) Rocks
2) Glow In The Dark Paint, Acrylic Paints
3) Paint Brushes/Sponges
*Pain design on the rock first then after it dries use the glow paint on top.
**You can also use ping pong balls :)
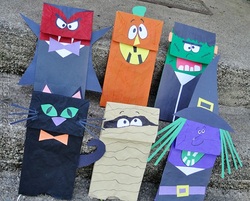
What You Need:
Brown paper lunch bags
Acrylic paint in green, red, purple, black, orange and antique white
Construction paper
White paper
Glue stick, Scissors, Markers
Brown paper lunch bags
Acrylic paint in green, red, purple, black, orange and antique white
Construction paper
White paper
Glue stick, Scissors, Markers
- First you will paint all of your paper bags with acrylic paint and let them dry completely. I used Americana paints in Cherry Red, Lavender, Jack O' Lantern Orange, Antique White, Kelly Green and Black.
- Next you'll cut out shapes from construction paper to embellish your puppets.
- Eyes can be drawn with a black marker on to white paper and then cut out. Alternatively, you can use googly eyes.
- For mouths, glue the teeth onto the mouth hanging over the edge. Then trim by cutting around the outline of the mouth.
- You can make simple clothes like Frankenstein's jacket, Dracula's cape or the witch's dress from construction paper.
- For the mummy, use a black marker to draw on lines to look like bandages. For the Jack O'Lantern, use an orange marker to draw on lines. Other embellishments you can include are bolts for Frankie's neck, use a hole punch in purple paper for the witch's nose wart, and use a marker to draw on noses and Frankie's stitches.
- Use glue stick to attach everything then have a Halloween puppet show!
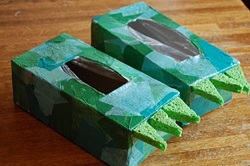
Monster Feet!
- 2 empty tissue boxes
- Paint
- Construction Paper
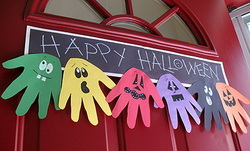
Construction paper: white, black, yellow, green, red, purple, black and orange
Black marker (or crayon)
White paint pen (or crayon)
Scissors
Glue stick
On any one of the colored papers trace your child’s hand. Stack green, yellow, purple, red, orange and black sheets on top of each other with the traced hand print sheet on top.
Tip: to keep the sheets together you can paper clip them on all four sides.
Cut out the handprint, cutting through all six sheets at once. If you prefer, do each one individually or only 2 or 3 at once. Whatever works best for you!
With fingers of the cut outs pointing downward, have children draw faces on the hand prints.
Fold a sheet of white construction paper in half lengthwise. Open up and cut along crease. Attach the two lengths of white paper together with glue stick, end to end.
Repeat this step with a sheet of black paper as well, only this time after folding in half, trim off about 1/2″ from the long ends and the same on the short ends. The idea is to make the black the foreground color, placing it on top of the white banner, making the white banner the border.
After you trim the black sheet, go ahead and cut it in half lengthwise like you did with the white one and glue on top of the white sheets.
Attach the hand print ghouls to the bottom of the banner with glue stick. Use white paint pen or white crayon to write Happy Halloween across the banner. Hang!
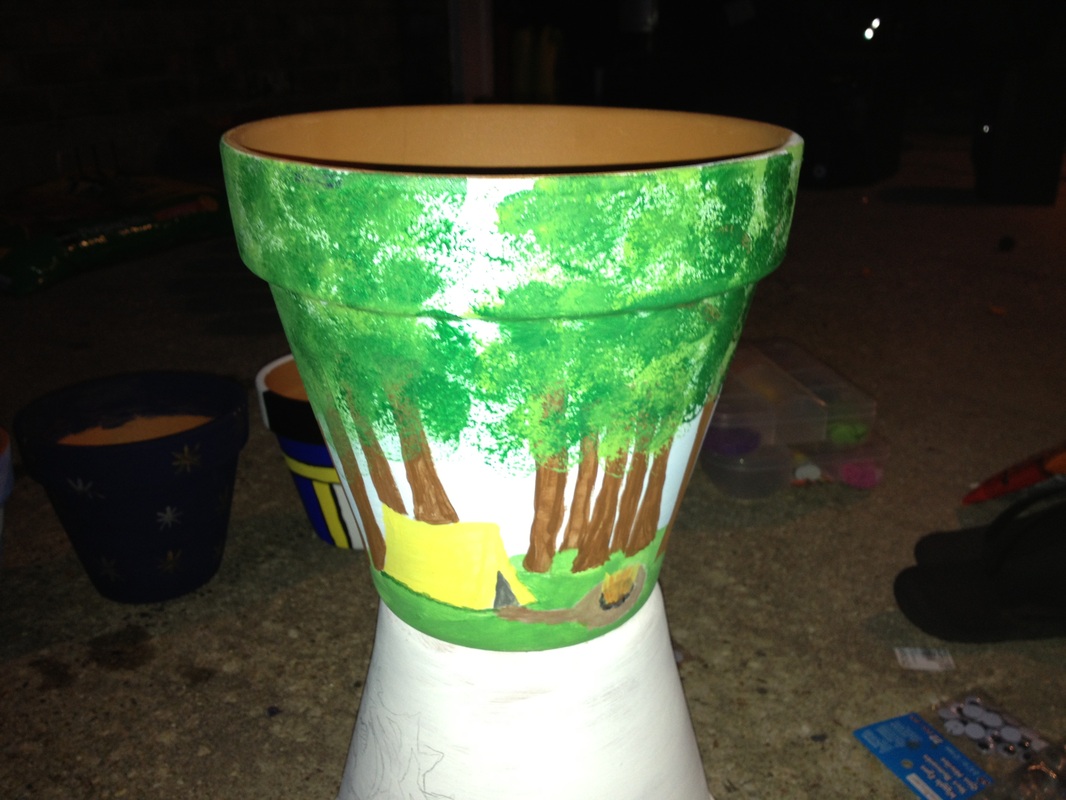
One of my favorite crafts to do with the kids is painting clay pots for my garden. Any size clay pots, acrylic paint, fun brushes and sealant and lots of laughs! http://www.bystephanielynn.com/2012/02/40-ideas-to-dress-up-terra-cotta-flower-pots-diy-planter-crafts-saturday-inspiration-ideas.html
Check out my craft board on Pinterest!
http://www.pinterest.com/ladyluckakr77/crafts/
http://www.pinterest.com/ladyluckakr77/crafts/
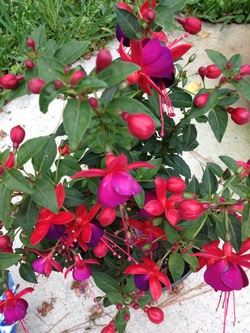
I love to garden! I start seedlings in the spring and watch them come to life. I try to find unique things to plant. I have a wide variety of different flowers, bushes, spices, veggies, fruit and herbs. I hope to have a complete one by next spring. Hopefully my greenhouse will be repaired and ready to go by then!
